Provides To create your backyard puppets you may need card stock or other stiff paper, scissors and adhesive, a pen or pencil, and paintmark or your favorite coloring materials. You'll also require a collection of different sized round things to trace. Drinking glasses, lids, bottles, thimbles and several other household items work great! Additionally, you'll require a few sticks or skewers to finish your puppets.

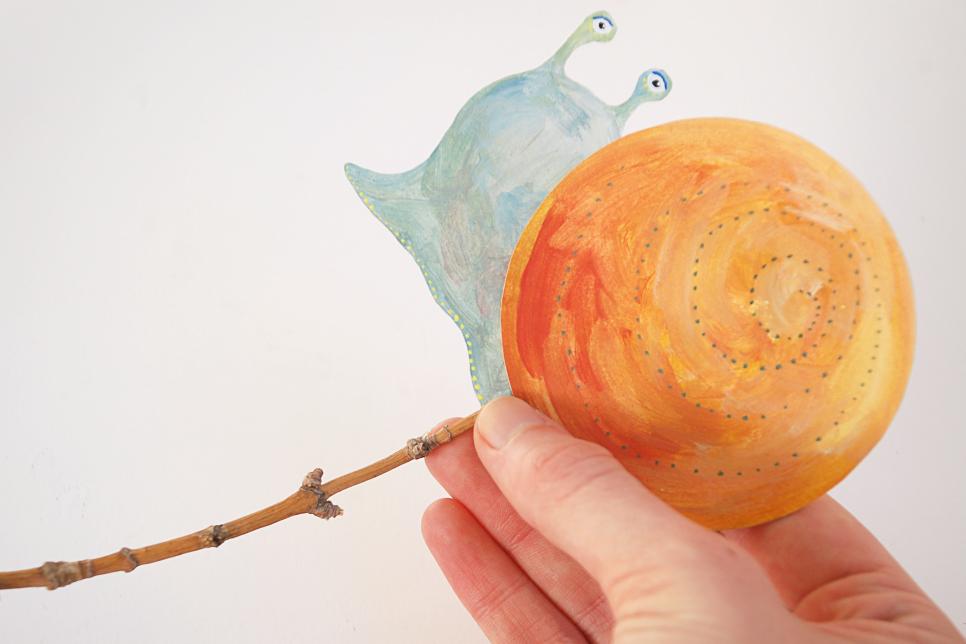
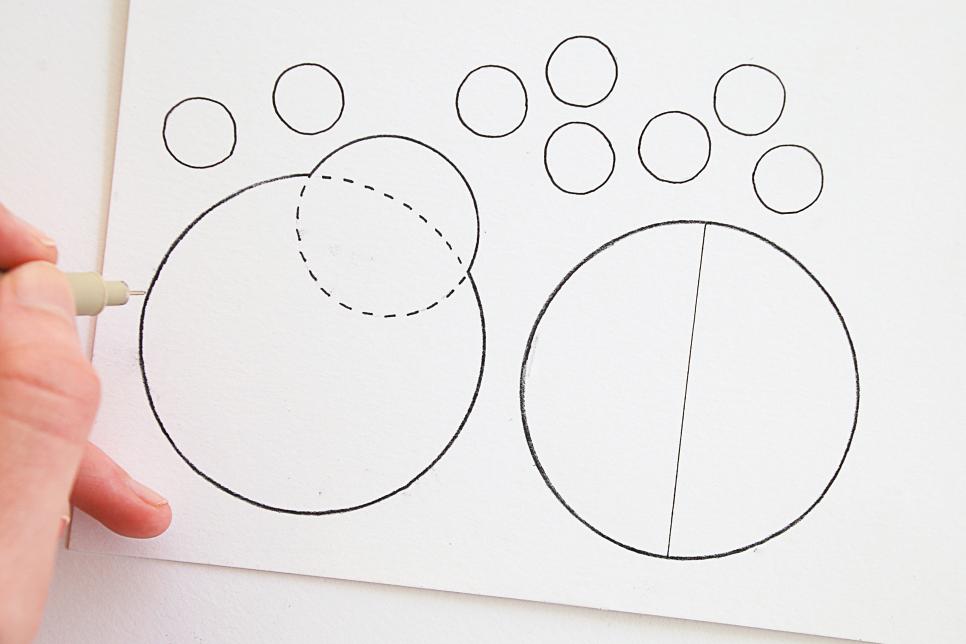
Tracing A Snail The first step to creating your puppets is hauling or drawing a circle. Lay right down your round item and trace around it. For a snail you may need one big circle to the shell, along with a smaller circle for the head. Draw the rest of the snail's body. Erase the areas of the circle you don't need, suggested here using a dotted line.

Coloring Your Shapes Once you have traced out the fundamental shapes, colour them in with your choice of materials. You can use paint, markers, colored pencils, crayons or anything else you can think of. Do not worry too much about acquiring all the color perfectly inside the lines, so you can trim it down in the next step.

Cut Out Your Shapes Once you've the basic colours down, then cut out the shapes across the lines your originally drew. Reduce any spots where the color went outside the borders.

Glue Your Shapes Together Arrange them once your pieces are cut and paste them together. For your snail place a tiny bit of adhesive along his spine, and set the shell on top.

Adding Details Once your pieces are glued together it is possible to choose where to include particulars. This is a superb time to include eyes, textures, patterns and whatever else you enjoy. Dots are fun and easy additions to give your critters a little extra character.

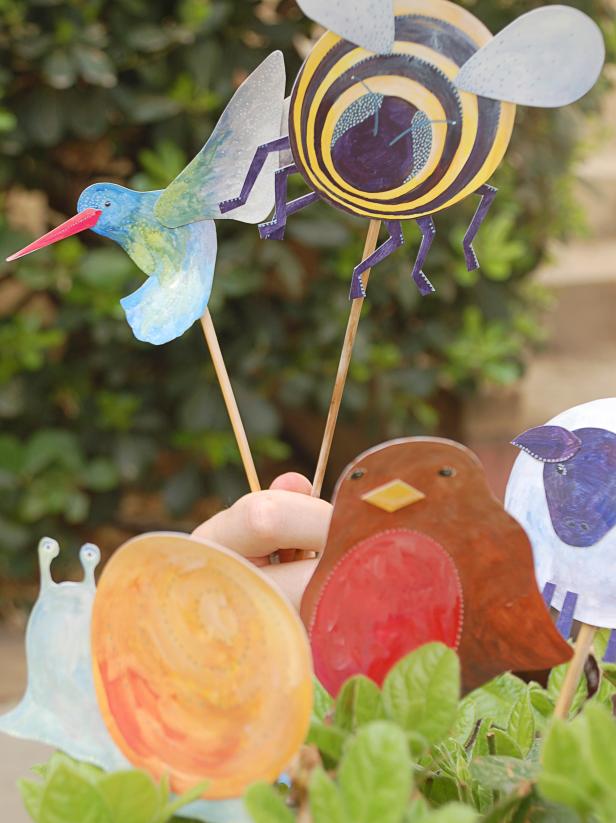
Finishing Touches Once your critter is pieced together and of the paint and glue is dry, you'll need to put in a rod to the back to turn it into a puppet! Twigs from the backyard are perfect for this, but skewers or popsicle sticks will work too. Use glue or a piece of tape to attach the stick to the back of your own sanity.
Ladybug Shapes As soon as you've mastered the snail, it's easy to create a ladybug with just a couple more circles. Trace two large circles for the entire body of your own ladybug. Put a moderate circle overlapping the first large circle to make a head. Split the second circle in half to your ladybug's wings. Trace a series of circles to make your ladybug's spots.
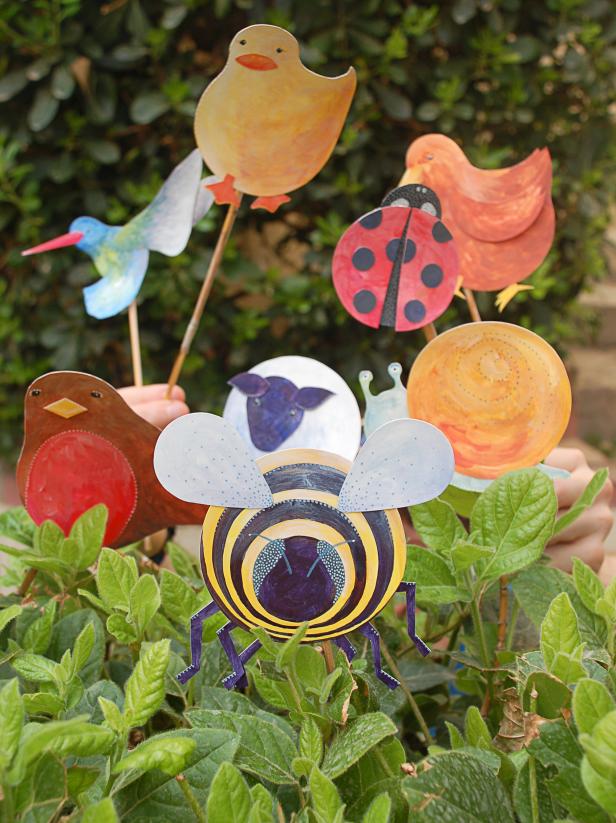
Completed Ladybug Color and cut out your ladybug shapes. Twist the polka dots on the massive wing circle and cut the ring in half. Attach the wings to the ladybug's body by gluing them near the bottom of the head. If you want to make your ladybug a little more interactive you can use brads instead of adhesive to attach your wings. That way they will be able to move.

Bumble Bee Shapes To get a bit more of a challenge, consider producing a bumble bee! Trace a large circle for the body, using a smaller ring inside to your mind. Trace two circles to the wings, making them about precisely the same size as the head. Then follow a smaller circle right next to each of them to form the wings. Draw 6 zigzags for thighs, you may use a ruler if you would like the lines to be perfectly straight.

Finished Bumble Bee Color and cut your bumble bee shapes. Do not forget to include the stripes when you're painting your system. Glue the wings close to the top of the human body, and then attach the legs in the bottom, behind your system. Such as the ladybug, you may use brads instead of glue if you need all the parts to move.

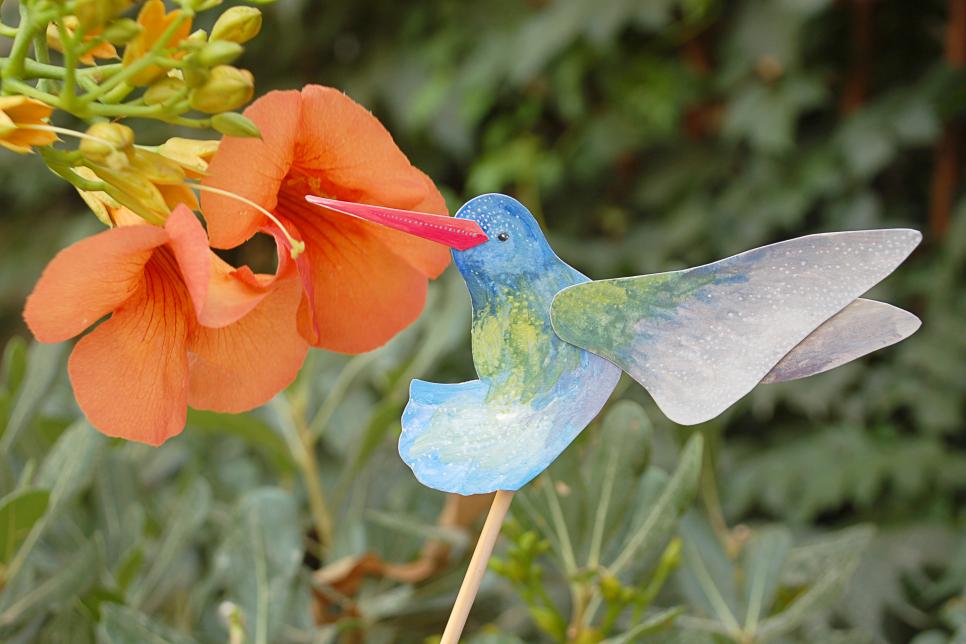
Hummingbird Shapes The basic hummingbird shapes begin quite much like the shapes you use to your bee's wings. Start out with 3 moderate circles each touching a smaller circle. Create wings with just two of these shapes by drawing a long triangle from the larger circle. Create a body together with the next shape by adding another circle in which the tail will be. Draw a long, narrow triangle for the beak.

Putting a Hummingbird Color and cut out your pieces and then glue the beak into the bird's head. Attach a brad or adhesive and add any specifics. Insert the rod the trunk and your bird is ready to fly.
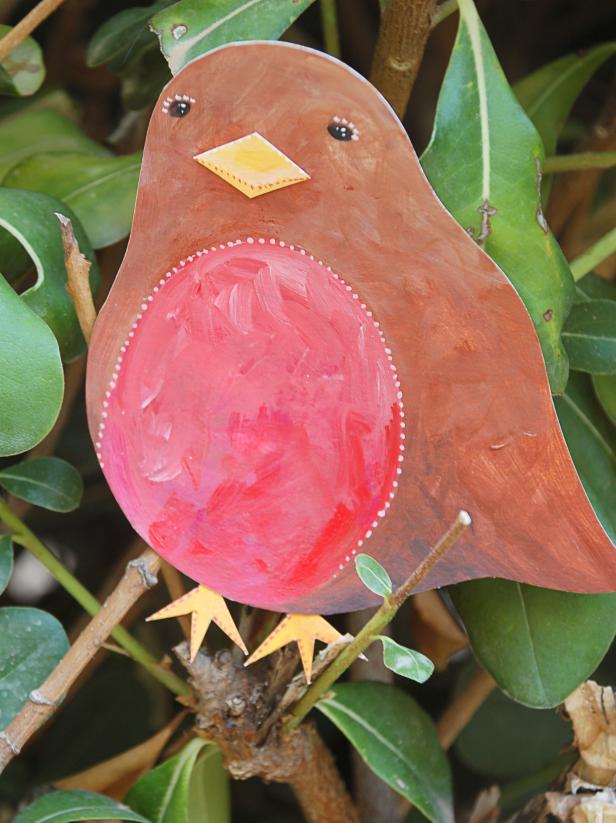
Robin Shapes Want to add a different garden bird? How about a red-breasted robin? Overlap a large circle and a medium circle to produce the body and head. Insert a triangular shape for the tail toward the base of the human body. Draw a diamond shape to your beak and 2 toes shapes.

Finished Robin Color and cut out your robin contours. Don't forget to add breast. Glue the beak and feet, and include feel eyes and other particulars.
Duck Shapes You may produce a cute duck as easily as a robin. Start out with the very same circles to the body and head, but add a tail up in the top. Flatten the back between the tail and head a bit. Draw an oval for the beak and 2 feet. The feet are simple to draw if you begin with a diamond shape and curve a few lines to produce webbed duck feet.
Finished Duck Color and cut out all your budding contours. Glue the beak and feet on. Add eyes and some other specifics. If you want to add a wing, then see the chicken at another step to understand how.
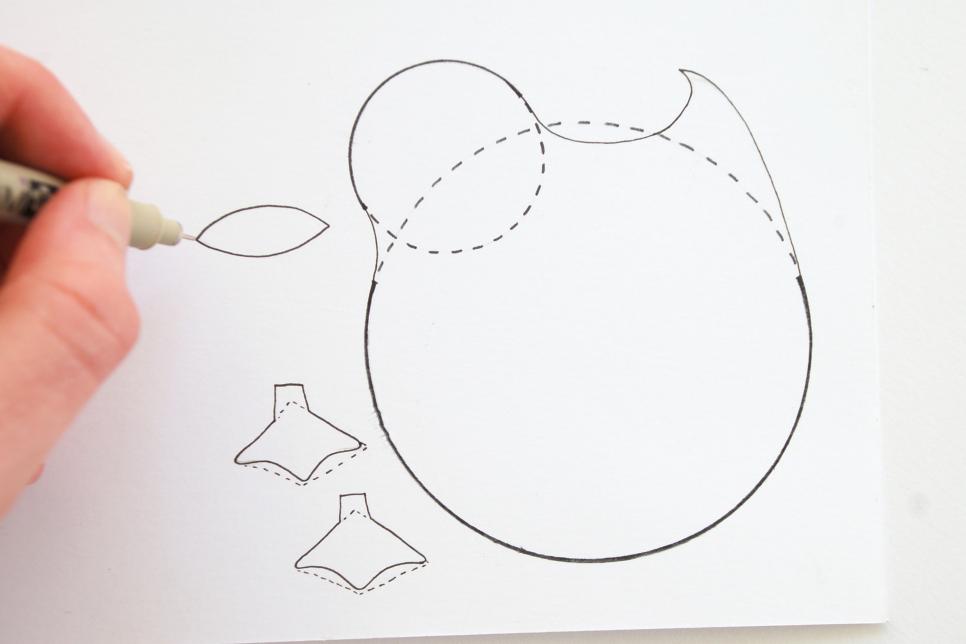
Chicken Shapes A chicken is quite similar to a robin or duck, and just requires a few more steps. Begin the body in the same way, with overlapping large and mild circles, and then include a pointed tail. Flatten the back a little and draw a bead for the beak, along with 2 toes shapes. Produce the wing by drawing a ring. Overlap another circle on top to make a crescent form. Erase the rest of the ring so that you are left with a half moon shape for your wing.

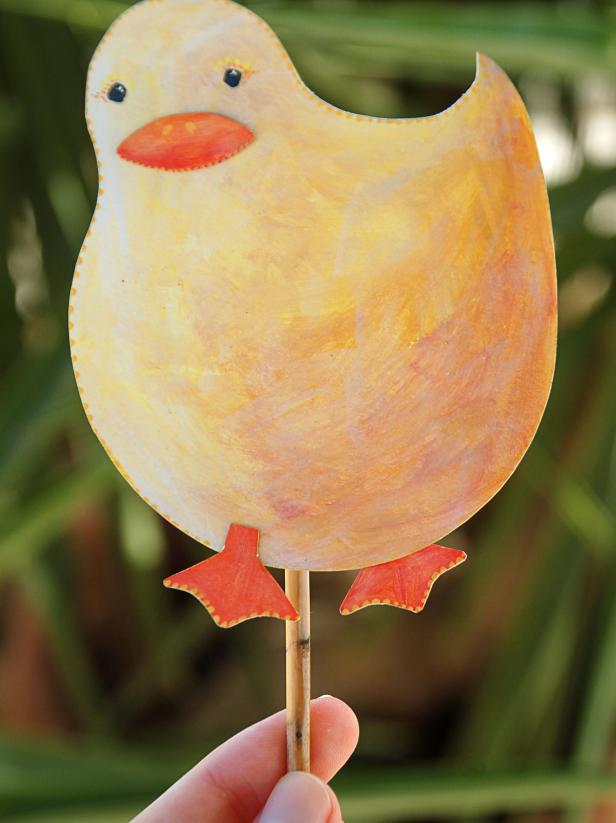
Finished Chicken Color and cut out all the pieces for your chicken. Glue on the beak and feet. You can paste the wing on, or attach it with a brad so it moves. Insert a watch and any additional details or texture you like.

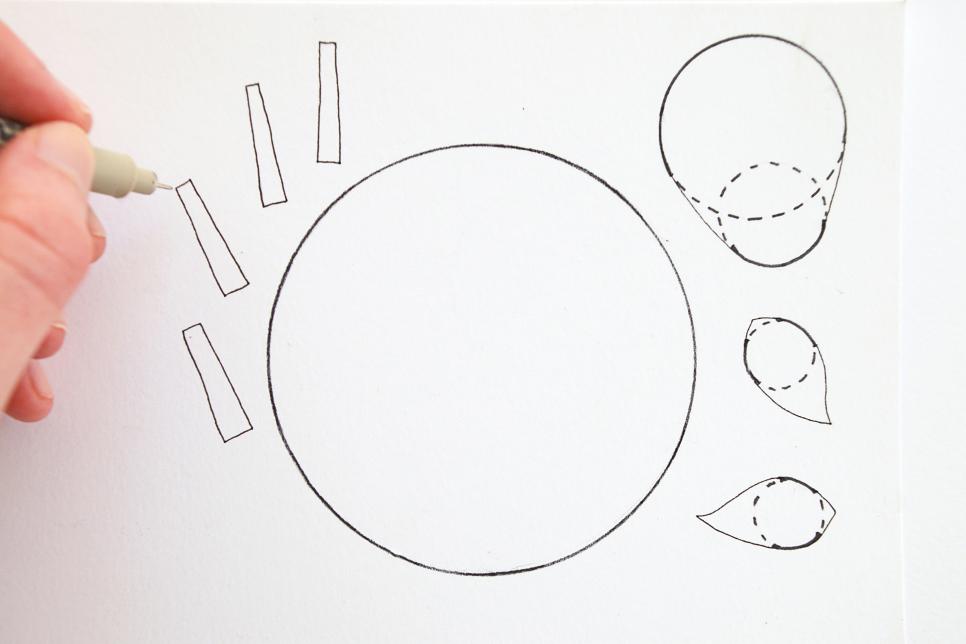
Sheep Shapes Wish to make a larger farm animal? Try out a sheep. To make the sheep you will need one big circle for the body and two little circles for the ears. Create the head by placing a medium circle and small circle directly next to each other and connecting them with lines. Add points to the little ear circles to make ear shapes. Draw 4 little rectangles for thighs.
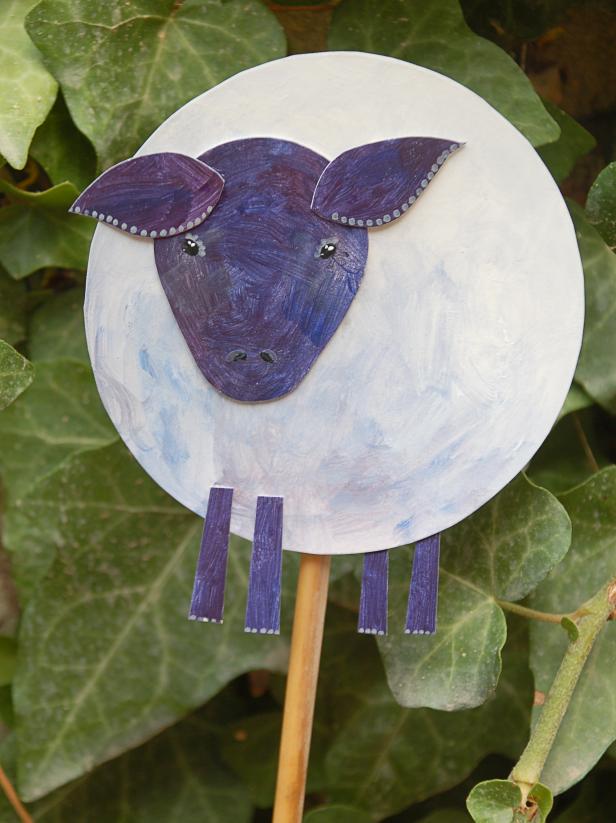
Finished Sheep Color and cut your sheep out bits. Glue the legs and head. If you would like to get creative you can attach your ears together with brads in order that they wiggle, or simply paste them on. Now you've got a whole backyard gang for an ideal puppet show.
Finished Puppets Once all of your puppets are constructed and attached to their own sticks, you are prepared for a puppet show. Send the kids outside to find the perfect point and allow their imaginations run rampant.